TL;DR
Nice project web page, how can I contribute with my own blog post? This is what this blog post is about. I will explain the workflow of “how to create a new blog post” and thereby illustrate how to use the tools Git, GitLab and Jekyll for these purposes.
There are minimal requirements for a blogger to add a new blog post while a proper review process is still essential for the quality of the blog posts. So let us jump into it.
Note: In case you are interested to know how to contribute to HIFIS Software web-page in general besides writing blog posts you can find more information in the Contribution Guide [1].
Tools explained
First, I would like to introduce three tools which are very helpful if you are going to write a blog post.
Version Control System Git
Git [2] is a decentralized version control system which lets you store all files of your project and all snapshots / versions of your changes. It lets you track back the complete history with your log messages given. Decentralized means the whole repository resides as a copy on your local computer.
Version Management Platform GitLab
GitLab [3] provides you with user interfaces for several actions which can be done on the remote server without downloading the whole repository onto your local computer. There is also an issue tracker included. On top, there is a full Web IDE available which also let you review changes by your colleagues. Even if you are new to Git, the GitLab Web IDE offers an easy interface which can be employed for most of your Use Cases. There is no need to install Git, download the Git repository to your local machine and set up your own IDE to contribute with your blog posts.
Static Web Site Generator Jekyll
Jekyll [4] is a static web site generator. You only write Markdown text files and Jekyll takes care of the rest and generates a static web site containing only HTML and CSS according to your templates and layouts given.
Workflow in a Nutshell
Now that we know more about the tools used, I would like to introduce the steps I took to create this blog post. You can stick to these steps if you are writing your own blog post:
- Share, discuss or pick a post idea
- Write and share your post
- The review process
- Your post is online
By agreeing to this process we put you into the position of a fully authorized and equitable team member who is able to actually easily contribute with your own work to this web page.
On closer inspection, there are the following persuasive arguments to use Git, GitLab and Jekyll:
- You can collaborate with different authors and reviewers using a decentralized version control system like Git.
- There is a full traceback and logging functionality included in Git.
- GitLab lets you review, discuss and improve what you write in a well thought-out review process called Merge Request.
- GitLab Web IDE is actually a surrogate for a local IDE with Git integration.
- GitLab CI Pipelines make sure and check that all is still working as expected.
- With Jekyll you just need to know very few syntactic markdown features, there is no need to write your own HTML and CSS.
Finally, to make a clear statement … you don’t end up in a mess with multiple versions of a document floating around on local computers of several contributors.
Going into Details - a Step-by-step Guided Tour
1. Share, Discuss or Pick a Post Idea
First of all, you need some sound ideas regarding the topic you would like to blog about.
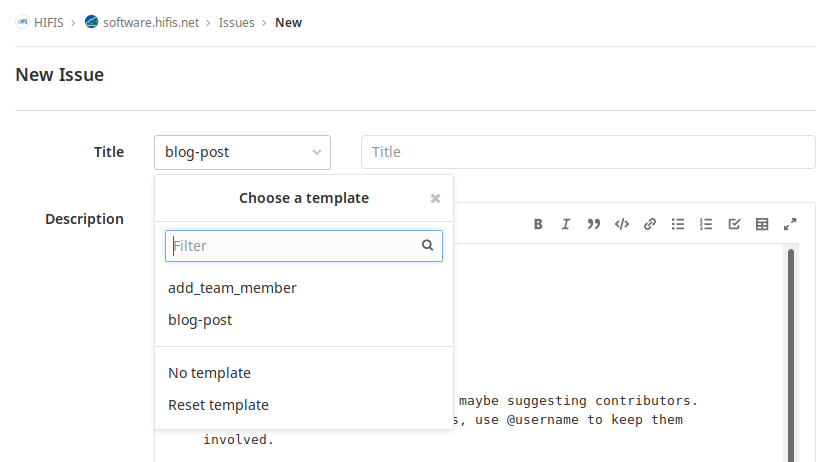
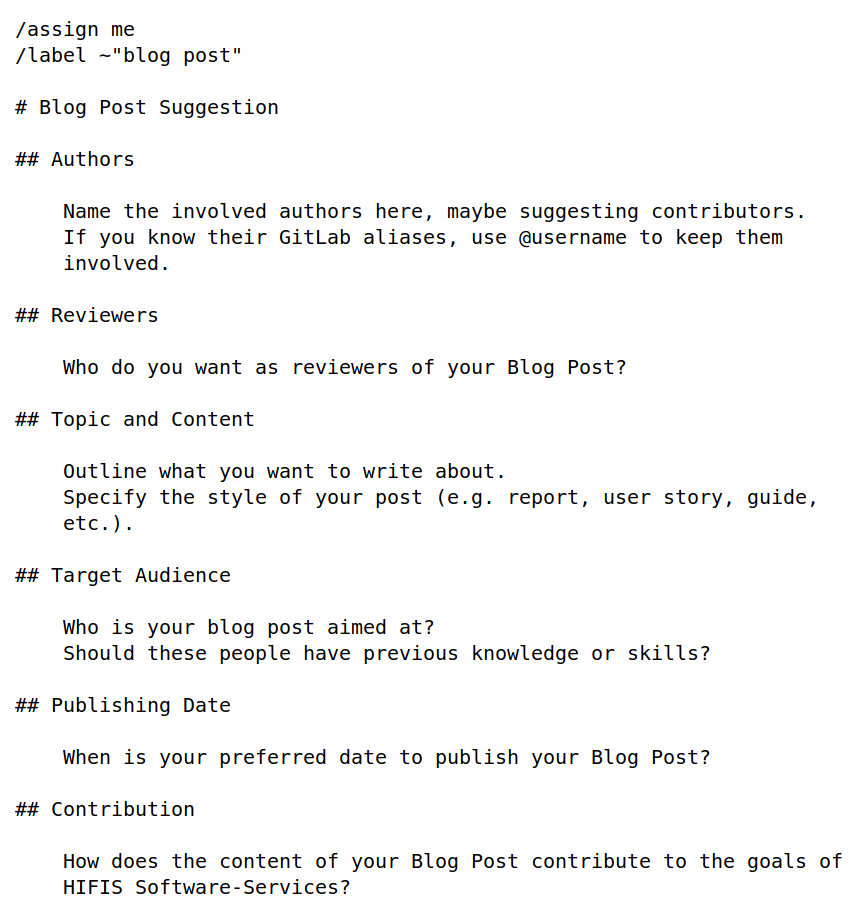
Open a new issue in the GitLab UI. In order to do so, you need an account in GitLab of HZDR [5] and being added as member to the respective GitLab project. Opening an issue is explained in the GitLab Docs [6. It is essential to give it a comprehensive title and description which reflects the basic idea of the topic. It is recommended to use the predefined Issue Template “blog-post” which guides you through the important questions that need to be answered in order to start a fruitful discussion. By doing so you let us know what you would like to write about. Assign this issue to the main blog author (which usually is yourself). If you use the template this will be done automatically for you. The images below show such a blog-post issue as well as the pre-defined description text and questions to answer.


2. Write and Share your Post
The next step is to create a Feature Branch based on branch master
and give it a meaningful name like <issue_number>-<branch_name>.
This can be done within the GitLab User-Interfaces
[7].
Navigate into this branch in GitLab and open GitLab Web IDE [8]. GitLab Web IDE is the preferred tool to contribute if you are unfamiliar with Git.
Notice the file system tree on the left hand side of the Web IDE UI.
You can find a template for your blog post in folder _posts/<year>/<month>.
The file name is 2019-10-29-Blog-Post-Template.md.
Feel free to copy it, give it a name according to the pattern
YYYY-MM-DD-My-post-title.md, put your new file into folder _posts/<year>/<month>,
and use it for your own purposes.
The template explains the so called Frontmatter which contains
variables like title, date, authors, etc.
Additionally, the most important markdown is explained by example
within the template as well.
Of course you want to remove the explanations and examples except for
the Frontmatter at the top of your markdown file.
Another helpful feature of the GitLab Web IDE is the Preview Markdown pane. You can check that everything you wrote is displayed as intended.
Now you are ready to start writing your Markdown file following the specific syntax of Markdown files [9].
Once you are done with your editing you would like to stage and commit your changes [10] giving it a meaningful message explaining your changes. There is a blog post [11] about best practices for writing Git commit messages. The more verbose your messages are, the easier it is for others to understand your changes.
3. The Review Process
After some effort and a few commits, let us assume your blog post
is in a state where you consider it ready to see the light of day.
What you want to do at this point is to open a Merge Request
[12].
GitLab’s User-Interface lets you open Merge Requests
[13].
Give it a meaningful title and description and mention the
original issue as well (e.g. by stating Closes #<issue_number>. in
the description).
Assign your Merge Request to one or multiple persons you would like to review the blog post. This is an important quality gate. Do not rely on reviewing your own work. Please select at least one other reviewer.
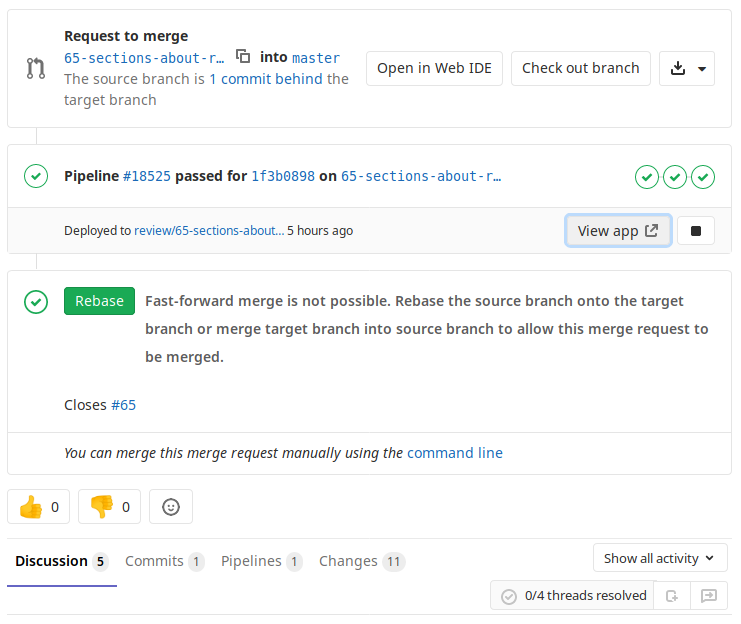
In order to make the review process as easy as possible GitLab offers a feature called Review Apps to inspect your branch. This enables the blog post authors as well as reviewers to preview the page in a test environment. As soon as your your branch is pushed onto the remote repository and the GitLab CI Pipeline responsible for deploying your branch finished successfully, you can inspect your latest deployments of your branch by clicking the button View app in the User-Interface of your Merge Request.

To access these pages you need to authenticate.
The credentials are as follows:
Username: hifis, Password: HIFISReview!.
As soon as someone reviews your blog post, all comments on your Merge Request appear as separate discussion threads which need to be resolved by the reviewers before they can actually merge your changes into branch master. This means that you first discuss and integrate the suggestions into your post as well as secondly add and commit changes to your branch.
All opened discussion threads need to be resolved and closed manually in GitLab before the final merge can take place by the reviewer.
Now, the reviewer finds a button “Merge” in that Merge Request in GitLab. This tells GitLab to integrate your changes into branch master.
By clicking that button a GitLab CI (Continuous Integration) Pipeline [14] is started and makes checks whether Jekyll can still build the whole project. In case all is fine, this is indicated by a success icon.
If the original issue has been referenced by Closes #<issue-number>.
the mentioned issue will be closed now.
Likewise, if the corresponding checkbox
“Delete source branch when merge request is accepted.”
has been checked on creation of the Merge Request in the
GitLab User-Interface the source branch will be deleted as well.
Finally, the Merge Request will be closed and marked as merged.
4. Your Post is Online
Now your post is integrated and online. Well done!
That was fairly easy. Wasn’t it? You have all the advantages of Git, GitLab and Jekyll at your disposal for quickly creating markdown-based blog posts of the highest quality.
If you are looking for a good Git tutorial I would like to suggest the one from the Software Carpentry group [15].
So what are the topics you would like to talk about today? Give it a try and let us know what your thoughts are which you would like to share with us.
References
- [1] Contribution Guide
- [2] Git (Wikipedia)
- [3] GitLab (Wikipedia)
- [4] Jekyll (Wikipedia)
- [5] HZDR GitLab Instance
- [6] Managing GitLab Issues
- [7] Create a new Branch in GitLab
- [8] Open GitLab Web IDE
- [9] GitLab Markdown
- [10] Stage and Commit Changes in GitLab Web IDE
- [11] Best Practice of Git Commit Messages
- [12] Merge Request
- [13] Creating a Merge Request in GitLab
- [14] GitLab CI (Continuous Integration) Pipeline
- [15] Software Carpentry Git Lessons
